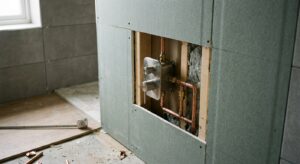
If there is no shutoff behind a fixture, the fixture cannot be serviced without cutting into a wall. That is not a plumbing problem to solve after the fact, it is a detailing failure that happened months earlier when someone specified a quarter-turn stop, the trade set it, and then the tile or stone contractor closed the wall over it without an access provision. The fix is not a homeowner tip. It is a drawing coordination issue that belongs on the RCP and the finish elevations before rock goes up.
Why stops vanish behind finished walls
Isolation valves get installed early, usually during rough-in, well before finishes are selected or their assemblies are detailed. The plumber sets the valve at the stub-out, caps it, and moves on. Nobody on that crew is thinking about a 3/8 inch stone slab or a large-format porcelain panel that will sit directly over it in six weeks. By the time the tile or stone shop drawings are being reviewed, the valve location is often not called out at all, because it was never flagged as a coordination item. It reads as a plumbing detail, not an architectural one, and it falls into the gap between trades.
The result is predictable: a fixture that needs service in year three, and a tech who has to guess where the stop is behind a fully grouted wall. Once that happens, the only paths are exploratory demo or replacing the valve access after the fact, both of which cost more than a $150 access panel specified at CD stage.
Code minimums for access panel size
IPC 606.1 requires that shutoff valves be accessible. It does not require them to be visible in the finished room, but it does require that they can be reached for operation and service without demolishing permanent construction. That single clause is the entire basis for every access panel note that should appear on your drawings. If a valve is going behind tile, stone, or built-in joinery, the assembly needs a documented means of access, full stop.
In practice, the trade standard for a functional access opening is 12 by 12 inches, sized to get a hand and a wrench in, see the valve body, and read any labeling. Smaller panels exist, but anything under 8 by 8 inches usually cannot accommodate the escutcheon plate and stem clearance together, which means the tech has to remove more than the panel to do the work. If the valve sits deep in a chase or behind a thick stone module, oversize the panel rather than undersize it. Nobody has ever complained that an access panel was too easy to work through.
Blocking and access in stone assemblies
Stone and thick porcelain cladding are set on a substrate, typically cement board or a mortar bed over blocking, and that substrate is where the access provision has to live, not as an afterthought cut into finished stone. Detailing this correctly means the blocking layout and the access panel location are coordinated on the same sheet, before the setting bed goes down.
Practical points for stone and heavy tile assemblies:
- Locate the valve access panel on the shop drawing for the stone or tile layout, not just the plumbing rough-in sheet, so the setter knows to leave a removable section.
- Use a panel material and finish that can be cut into the same slab pattern, either a matching stone insert on a mechanical fastener or a recessed metal panel with a stone veneer face, so the seam is planned rather than improvised.
- Avoid centering the panel on a grout joint alone. Grout lines are not structural access points and will crack or fail under repeated removal.
- Confirm the setting bed thickness does not reduce the clear access dimension below the 12×12 minimum once tile or stone is applied.
None of this is exotic. It is the same coordination logic used for any recessed niche or blocking detail, applied to a valve instead of a shelf.
Escutcheon depth vs valve stem reach
Once access exists, the next failure point is escutcheon depth against actual wall build-up. A quarter-turn ball valve has a stem that projects a fixed distance from the valve body, and the escutcheon has to reach the finished wall plane without binding the handle or leaving a gap that exposes rough plumbing. On a standard 1/2 inch drywall assembly this is rarely an issue. On a tiled wall with backer board, thinset, and a stone tile, the wall plane can move out an additional half inch to an inch, and the stock escutcheon depth may no longer reach.
Two outcomes follow from getting this wrong. Either the escutcheon sits proud of the wall and never seats flush, which reads badly and traps moisture at the edge, or the handle cannot complete a full quarter turn because it is binding against the tile face. Neither is a defect in the valve. It is a coordination miss between the plumbing spec and the finish assembly thickness. This is the same category of check you’d run when specifying complete shower systems with valve, head, and body jets sharing one wall plane, where trim depth has to be confirmed against the actual finished wall build-up, not the nominal stud line.
The fix is simple and belongs in the spec review: confirm escutcheon depth range against the total finished wall thickness for that specific assembly, not a generic wall section. If the range does not cover it, specify an extended escutcheon kit or adjust the valve rough-in depth before the wall closes.
Calling out access on RCPs and elevations
The single biggest reason this fails on real jobs is that access panels get treated as a plumbing note buried on an M-sheet, where the tile and stone subs never look. If it matters to how the finish reads and functions, it needs to be on the documents the finish trades actually reference.
| Drawing | What to show |
|---|---|
| Reflected ceiling plan | Access panel location and size if valve sits above a soffit or behind a ceiling-height panel |
| Interior elevation | Access panel or removable section shown in the same view as tile/stone layout, with dimensions |
| Tile/stone shop drawing | Coordination note flagging the access location and confirming the setter will leave that section removable |
| Plumbing rough-in | Valve centerline and stem projection dimension, cross-referenced to the finish elevation |
A coordination note on the tile or stone shop drawing is the item most often skipped, and it is the one that actually prevents the problem. Without it, the setter has no reason to know that section of the wall needs to come apart later.
Retrofitting access without demoing finishes
When this was missed and the wall is already closed, the options are narrower and all cost more than doing it right the first time. A cut-in access panel can sometimes be added by scoring and removing a single tile or stone unit, provided the setting method allows for a clean cut without cracking adjacent units, but natural stone with tight veining or bookmatched layout often cannot be touched without visible mismatch. Flexible access solutions, like a magnetic or friction-fit cover plate set into a cut opening, can restore access without a full panel frame, but they still require a defined opening in finished material.
In assemblies where the finish cannot be disturbed at all, the only remaining path is accessing the valve from an adjacent space, such as a closet or the back side of a wet wall, which only works if that access was preserved during rough construction. This is worth checking during any renovation scope review before finishes are ordered, not after.
Before any tile or stone submittal is approved, confirm the access panel location and size appear on that submittal, not just the plumbing drawings. Verify escutcheon depth against actual finished wall thickness, not nominal stud depth. And treat the IPC 606.1 access requirement as a coordination checklist item at CD review, not a field problem for the plumber to solve after the wall is closed.